Setup
Format
The workshop consists of explanatory discussions interspersed with hands-on exercises. We strongly encourage you to bring a laptop with all required packages installed in order to fully participate. We will also have office hours with CZI computational biology staff available in the morning to help troubleshoot any installation issues before class begins.
Installation guide (before class)
1. Install Python via Anaconda
Even if you have previously installed Python, please install Anaconda for Python version 3 (available on OSX, Linux, and Windows). You can simply click through the install wizard (no customization required, all the defaults are fine).
Anaconda is package manager, which means that it helps coordinate your Python installation and related packages (useful code written by other people for performing specific tasks) for you so that you have a consistent environment (the version of Python and the version of the code in each package that your computer looks at when doing your analysis).
You should now see an icon for "Anaconda Navigator" in your Applications folder (mac) or the Start menu (Windows). Please contact the instructors if you do not see this icon!
2. Install required packages (for Mac OS)
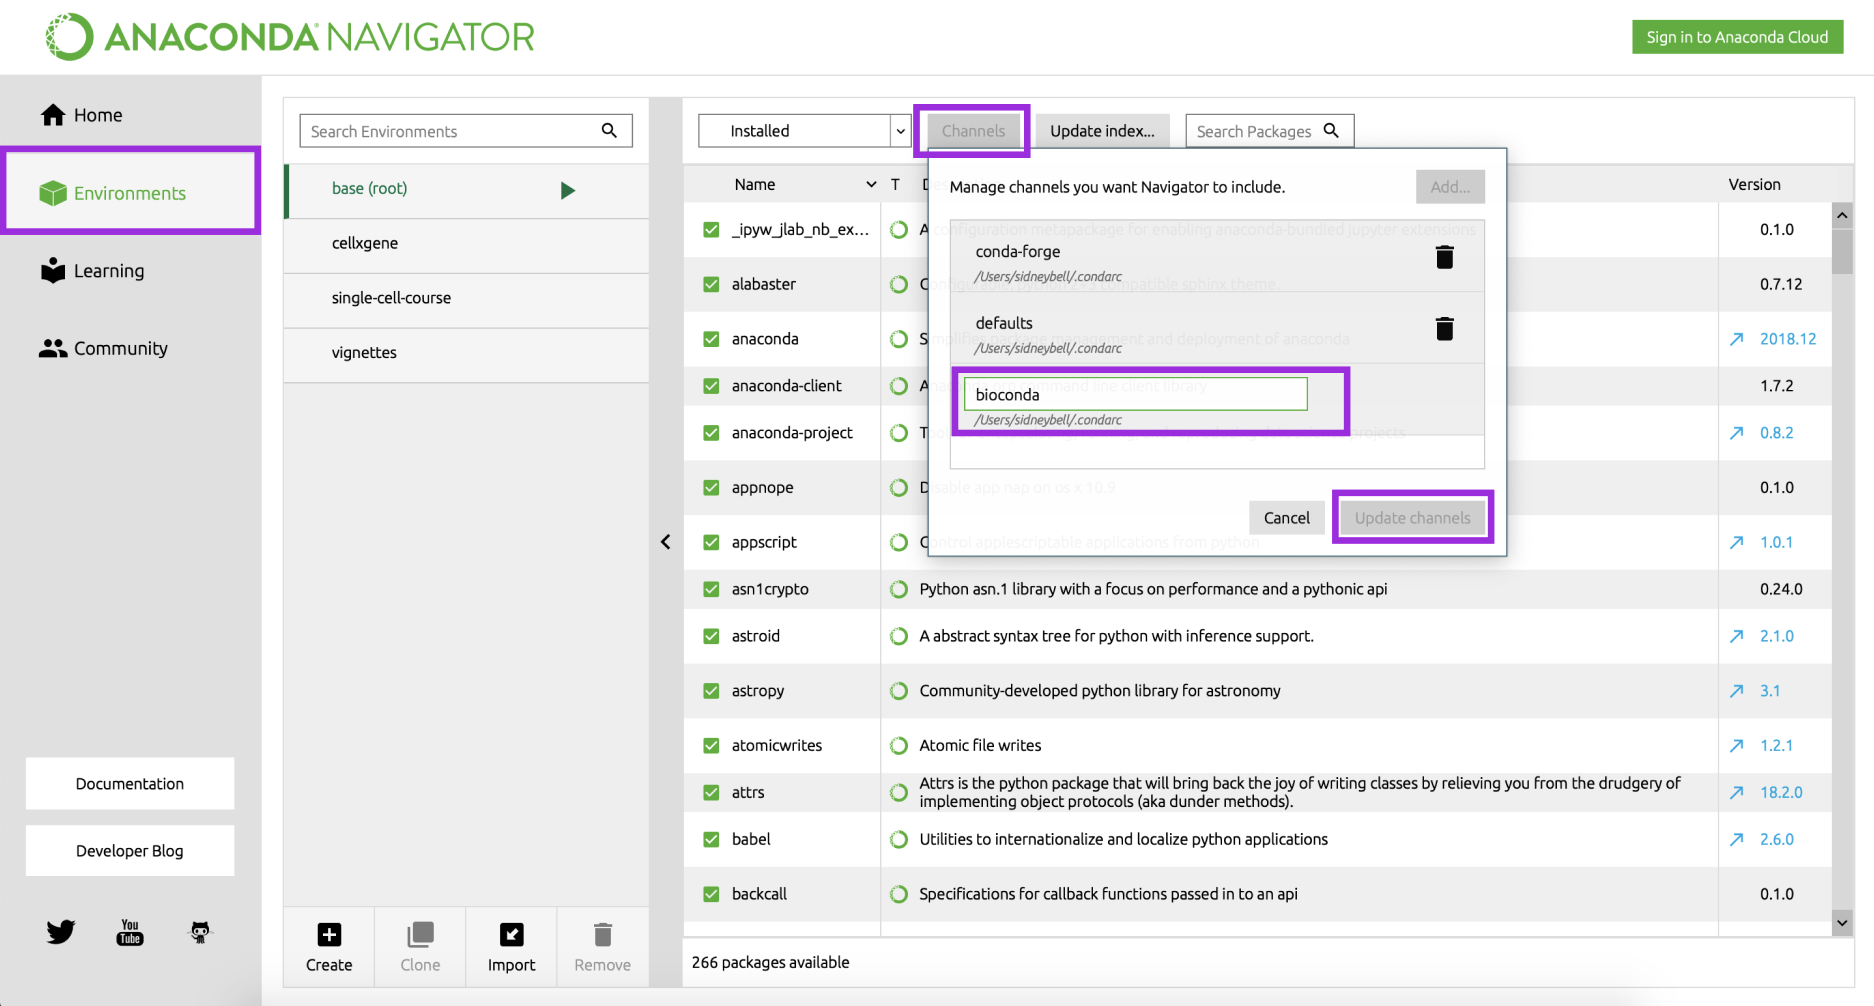
2A. Install Bioconda
Not everyone who uses Anaconda is a biologist. As a result, some biology-specific packages are only available in the Bioconda channel (collection of packages).
- Open Anaconda Navigator.
- Click on
Environmentsin the left sidebar - Click on
Channelsin the top middle of the screen - Click on
Add... - In the bottom text box, type
biocondaand pressEnter - Press
Update channels
2B. Download the course config file
To handle installation of all the Python packages required for the workshop (both days, all tracks), we have prepared a configuration file that tells Anaconda how to configure your environment.
- Download the configuration file called
sfn-workshop-mac.ymlhere. Save it an a spot you'll remember. - Open Anaconda Navigator
- Click on
Environmentsin the left sidebar - Click on
Importin the bottom left - Enter
sfn-workshopas the Name, and browse for thesfn-workshop-mac.yamlfile you just downloaded - Press
Import

2. Install required packages (for windows)
2A. Download the course config file
To handle installation of all the Python packages required for the workshop (both days, all tracks), we have prepared a configuration file that tells Anaconda how to configure your environment.
- Download the configuration file called
sfn-workshop-windows.ymlhere. Save it an a spot you'll remember. - Open Anaconda Navigator
- Click on
Environmentsin the left sidebar - Click on
Importin the bottom left - Enter
sfn-workshopas the Name, and browse for thesfn-workshop-windows.yamlfile you just downloaded - Press
Import
2B. Install scanpy (for Windows users in the single-cell track only)
- Click on the green play button next to the
sfn-workshopand choose 'Open terminal' - Enter
python3 -m pip install scanpyand pressEnter
3. Check your installation
- Open Anaconda Navigator
- Click on
Environmentsin the left sidebar - Select the
sfn-workshopenvironment from the list. This may take several minutes. - Click on the green
playbutton that appears - Select
Open with Jupyter Notebookfrom the list
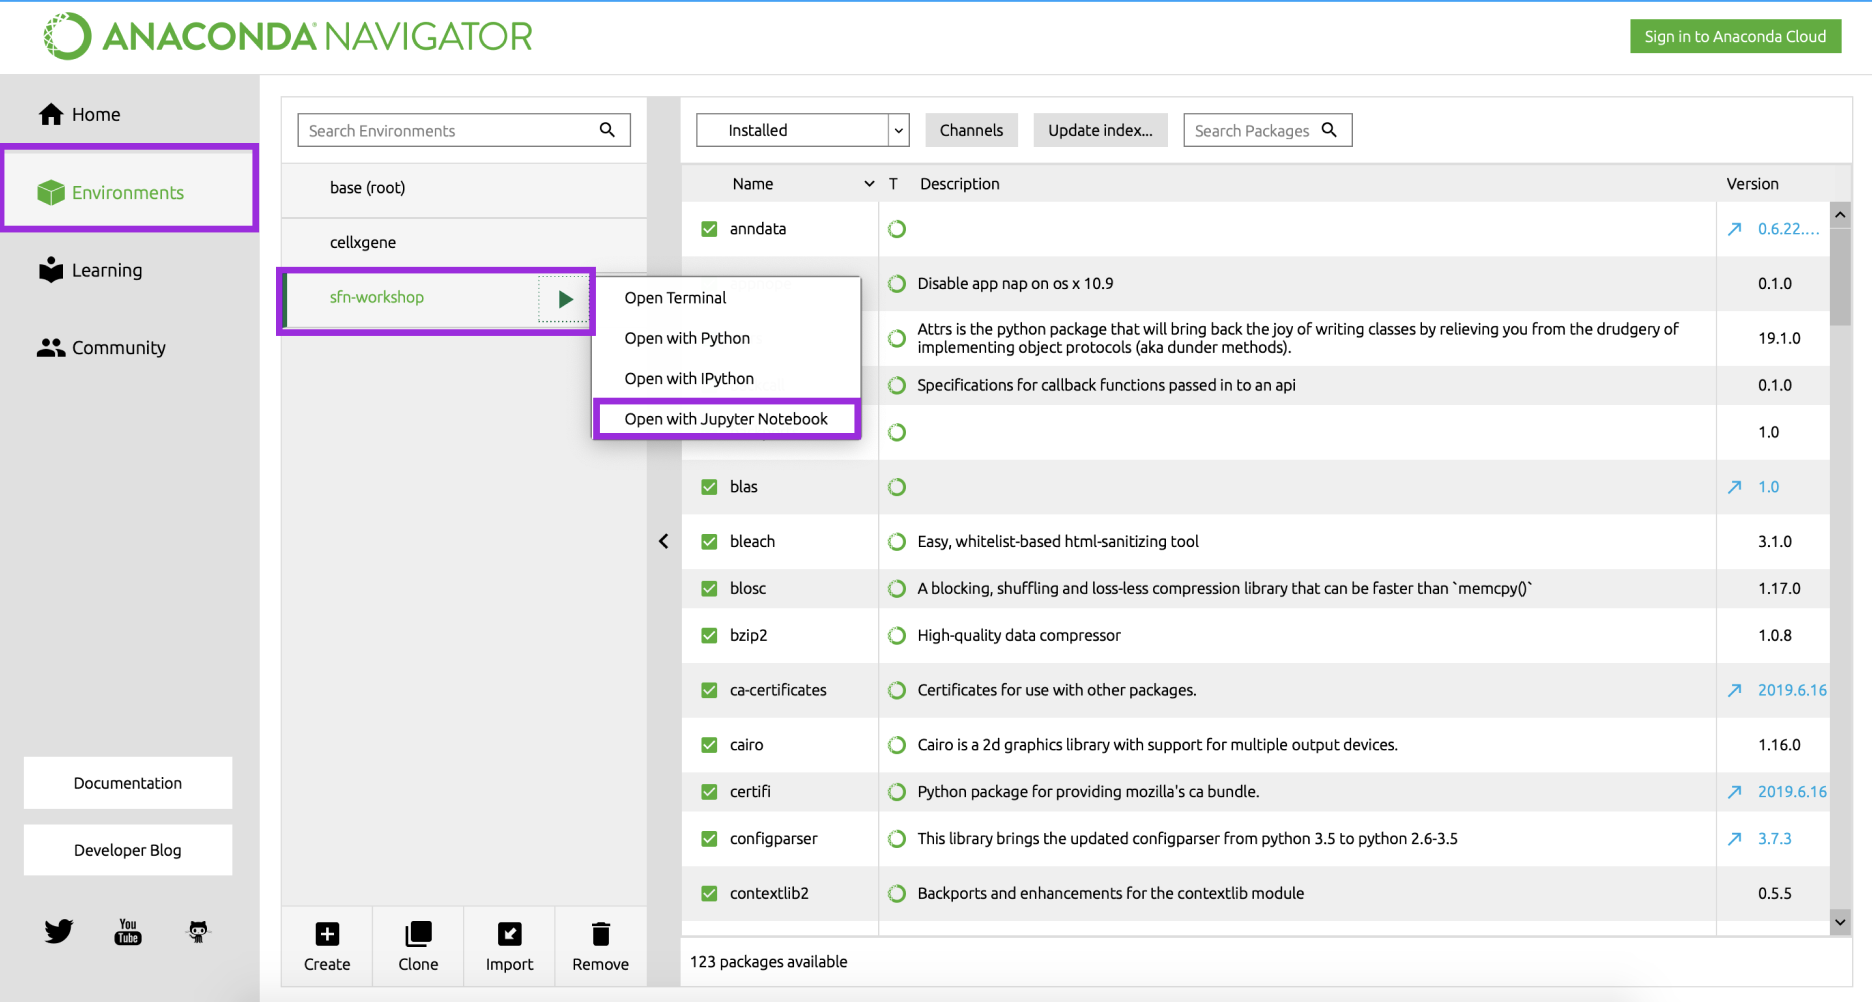
You should get a browser tab that says "Jupyter" at the top and lists all the files on your computer. This might not seem like much, but is all you need to get started! :)
If this does not work, please come to office hours before class so the CZI computational biology team can help you
4. Download course files
For the imaging track
Go to https://github.com/sofroniewn/2019-ndcn-comp-bio-imaging
For the single cell track
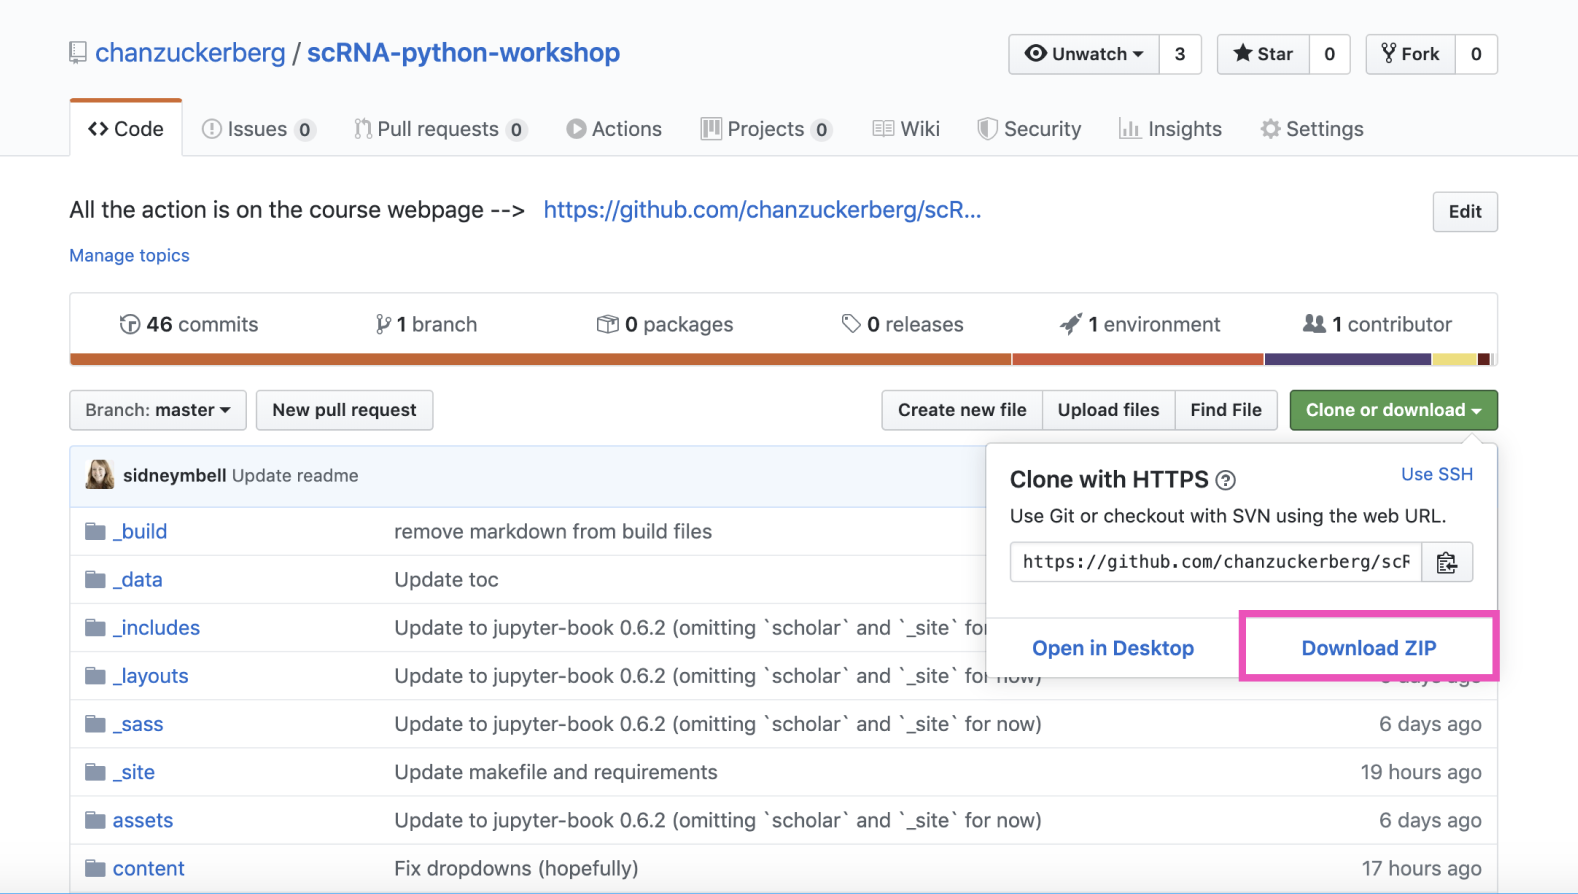
Go to https://github.com/chanzuckerberg/scRNA-python-workshop
Clone or download contents
If you are comfortable cloning a repository with git, we encourage you to do so. Otherwise, click the green "clone or download" button and choose "download zip". We encourage you to do this the evening before class, as we may make some last-minute updates to the material.
5. Bonus: install fun visualization tools (optional)
- Open a terminal window (Mac: Applications > Utilities > Terminal; Windows: Start > Windows System > Command Prompt)
For the imaging track:
In the terminal window, copy and paste the following and press
Enter:python3 -m pip install napari
To test your installation of napari, type napari in the next terminal line and press Enter. You should see an application window open up.
For the single-cell analysis track:
In the terminal window, copy and paste the following and press
Enter:python3 -m pip install cellxgene
To test your installation of cellxgene, type cellxgene in the next terminal line and press Enter. You should see something like this:
Usage: cellxgene [OPTIONS] COMMAND [ARGS]...
Options:
--version Show the version and exit.
--help Show this message and exit.
Commands:
launch Launch the cellxgene data viewer.
prepare Preprocesses data for use with cellxgene.