The Relion Dashboard
py2rely ui is a browser-based pipeline visualizer and job monitor for RELION projects.
It shows the full job DAG, live status, logs, output files, and 3D density maps — all in one place.
It also includes an interactive Mask Tuner for designing MaskCreate masks.
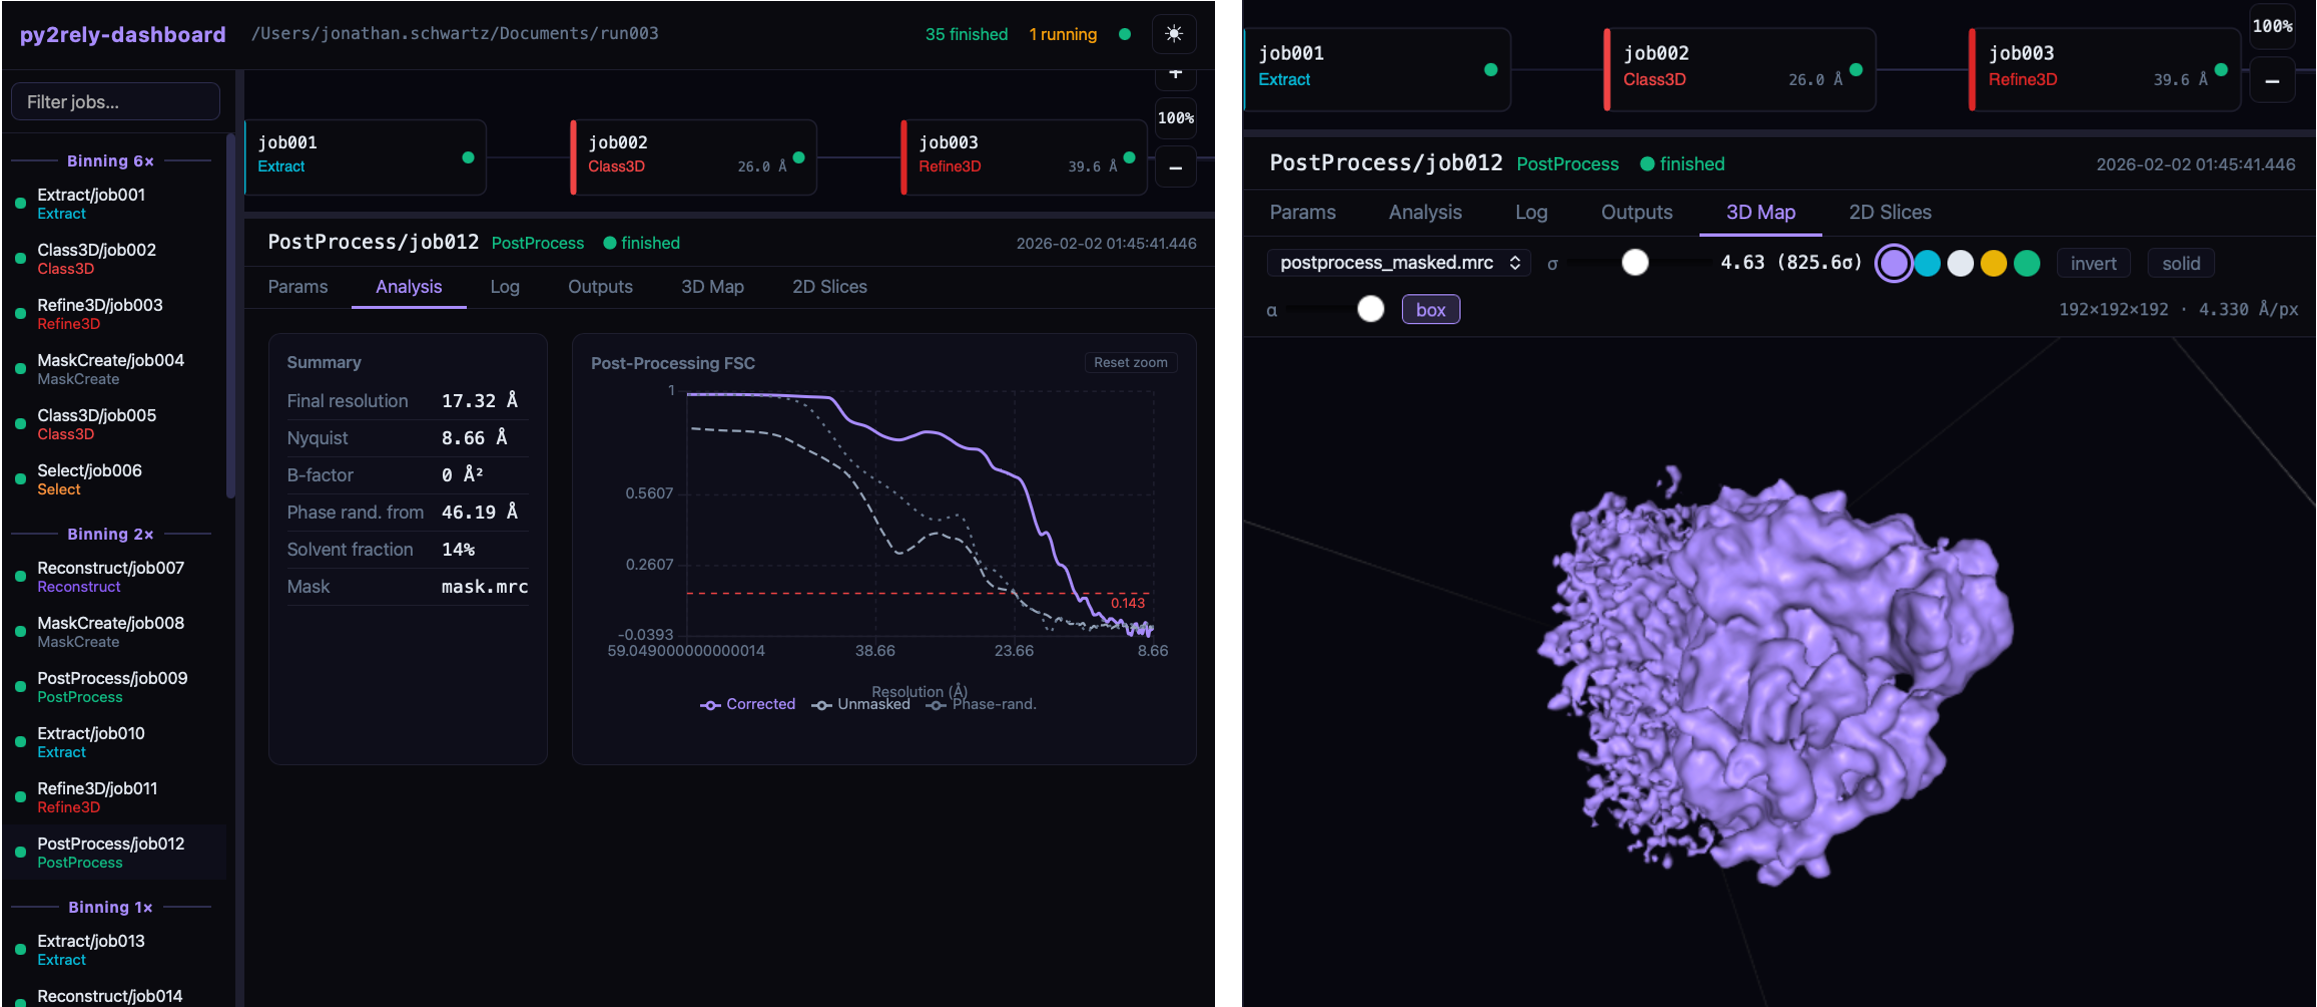 The py2rely dashboard showing the full RELION job graph, live job status, post-processing resolution analysis (FSC), and an interactive 3D density map viewer.
Installation
The dashboard requires a small set of additional dependencies that are not installed by default.
Install them with the dashboard extra:
pip install ".[dashboard]"
This adds FastAPI, uvicorn, and watchdog to your environment. No Node.js or npm is required — the web interface is pre-built and shipped with the package.
Launching
Run py2rely ui from inside your RELION project directory (the folder containing default_pipeline.star):
cd /path/to/my-relion-project
py2rely ui
The server starts on port 3000 and opens your browser automatically:
[py2rely-dashboard] Running at http://127.0.0.1:3000
No default_pipeline.star found?
If py2rely cannot find default_pipeline.star in the current directory it will exit with
a helpful message. Make sure you cd into the RELION project root before running the command.
Remote / HPC Usage
When running on an HPC cluster, bind to localhost (the default) and forward the port over SSH from your local machine:
# On your laptop — open an SSH tunnel
ssh -L 3000:localhost:3000 your-hpc-host

# On the HPC node — start the server (no browser needed)
cd /path/to/my-relion-project
py2rely ui --no-browser --port=3000
Then open http://localhost:3000 in your local browser.
The same tunnel works for the Mask Tuner — run py2rely create-mask <map> --no-browser on the
HPC node and open the printed URL locally.
Exposing on all interfaces
If you need the UI accessible on the cluster network without a tunnel, pass --host 0.0.0.0.
Only do this on a trusted network.
py2rely ui --host 0.0.0.0 --no-browser
📝 Options for py2rely ui
py2rely ui [OPTIONS]
| Option | Default | Description |
|---|---|---|
--port |
3000 |
Port to serve on |
--host |
127.0.0.1 |
Host to bind to |
--no-browser |
off | Suppress browser launch |
--poll-interval |
5 |
Seconds between polls |
📝 Options for py2rely create-mask
py2rely create-mask INPUT_MAP [OPTIONS]
INPUT_MAP is the density map (.mrc) to build a mask from; the tuner opens preloaded on it.
| Option | Default | Description |
|---|---|---|
--port |
3000 |
Port to serve on |
--host |
127.0.0.1 |
Host to bind to |
--no-browser |
off | Suppress browser launch |
Interactive Mask Create Job
The dashboard includes an interactive tuner for the MaskCreate job. It reimplements
RELION's relion_mask_create algorithm in Python so you can dial in mask parameters
and see the resulting mask rendered over the input density map in 3D before committing to a
full job.
Opening the tuner
There are two ways in:
Launch the tuner pointed straight at a density map. This works even outside a full RELION project — the positional argument is the input map you want to build a mask from:
py2rely mask-create Refine3D/job021/run_class001.mrc
The page opens preloaded on that map.
From a running py2rely ui dashboard, click the Mask Tuner button in the top bar.
You then pick the input map from the dropdown (any 3D map produced in the pipeline) or
paste a project-relative path.
Workflow
- Choose an input map — from the pipeline dropdown or a pasted
.mrcpath (preselected when launched viacreate-mask). -
Set the parameters — these mirror the RELION MaskCreate job options:
Parameter Description Lowpass filter (Å) Low-pass applied before binarization. -1disables.Pixel size (Å) Pixel size for the low-pass filter. -1uses the map header value.Binarization threshold Density threshold for the initial binary mask. Extend mask (px) Grow ( >0) or shrink (<0) the binary mask by this many pixels.Soft edge width (px) Width of the raised-cosine soft edge. Invert final mask Swap the masked-in and masked-out regions ( 1 − mask).Hover the ? next to any field for an inline explanation.
-
Click "Generate Mask" — the new mask is computed and overlaid (purple) on the input map (gold) in the 3D viewer. Nothing recomputes until you click again, so tuning stays cheap.
- Inspect and adjust — re-run with new parameters as many times as you like.
- Save — write the mask to a path of your choice (defaults to
mask.mrcin the project directory).
Picking the binarization threshold
RELION applies the threshold to the low-pass-filtered map. Click Preview
lowpass-filtered map (below the Lowpass field) to display the filtered map, then drag the
viewer's contour slider — it reads in raw density units, exactly the value
--ini_threshold expects. Press → threshold to copy the current contour straight into the
binarization threshold field.
What's written to the mask
The saved mask.mrc is a float32 map that inherits the input map's voxel size, origin, and
start indices, with density statistics (dmin/dmax/dmean/rms) set in the header — so it
stays aligned with the map it was built from, just like a real relion_mask_create output.
The page also shows the equivalent relion_mask_create command line for reproducibility.