Pre-processing Your Data
Pre-processing is where SABER inverts the traditional annotation burden. Instead of drawing masks from scratch, you run SAM2 once to generate all possible segments, then use the GUI to assign class labels by clicking. This page covers both the CLI commands and the annotation workflow.
Supported File Formats
-
Cryo-ET / EM
.mrc,.zarr -
Light / Fluorescence
.tif,.tiff -
Materials Science
.ser,.dm3,.dm4
Step 1: Generate Initial SAM2 Segmentations
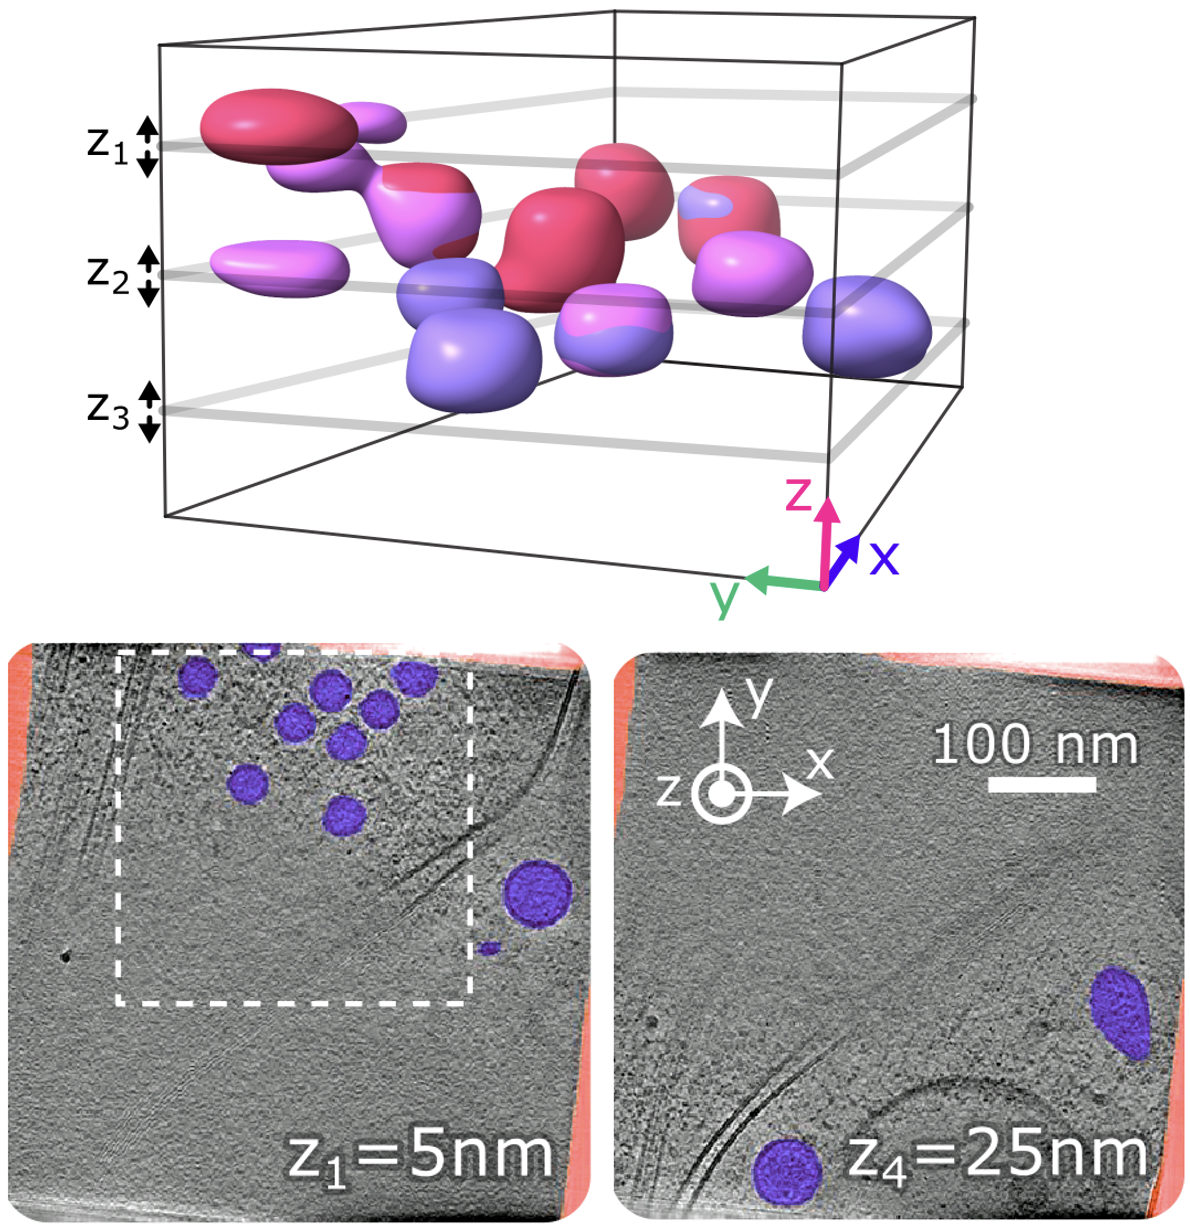
Use prep3d to slice the tomogram at multiple Z-depths and segment each slab with SAM2. The output is a Zarr file containing the original images, all SAM2 masks, and metadata.
saber classifier prep3d \
    --config config.json \
    --voxel-size 10 \
    --tomo-alg denoised \
    --num-slabs 3 \
    --zarr-path training.zarr
Why multiple slabs?
Small or sparse structures may not appear in every Z-depth. By sampling 3 slab projections at evenly spaced depths, SABER maximizes the chance of capturing every instance of your target organelle — especially important for structures that appear sporadically through the volume.
saber classifier prep3d Parameters
| Parameter | Description | Default |
|---|---|---|
--config |
Copick config file | required |
--voxel-size |
Tomogram resolution in Å | 10 |
--tomo-alg |
Reconstruction type (denoised, wbp) |
denoised |
--num-slabs |
Number of Z-depths to sample | 3 |
--zarr-path |
Output Zarr file | required |
Use prep2d to run SAM2 across a folder of micrograph files. Each image is segmented and all masks are stored in the output Zarr alongside the original data.
saber classifier prep2d \
    --input 'path/to/micrographs/*.mrc' \
    --output training.zarr \
    --target-resolution 10
Resolution matters
For .mrc files with embedded pixel size metadata, use --target-resolution (in Å) to automatically downsample to a segmentation-friendly resolution. For .tif files without metadata, use --scale N to downsample by a fixed factor instead.
saber classifier prep2d Parameters
| Parameter | Description | Default |
|---|---|---|
--input |
File path or glob pattern | required |
--output |
Output Zarr file | required |
--target-resolution |
Target resolution in Å (for MRC) | — |
--scale |
Downsampling factor (for TIF) | — |
Step 2: Annotate with the SABER GUI
Launch the interactive annotation GUI to label the SAM2 masks:

How annotation works
- Browse through the pre-computed SAM2 segmentations.
- Click on a mask to select it.
- Assign a class using the menu on the right.
- Save the resulting JSON file using the button in the lower right.
You never draw masks by hand — you only classify what SAM2 has already found.
How many images to annotate?
- 20 images: When multiple instances of your target appear per image
- 40 images: When instances are sparse or the structure varies significantly
- Prioritize diversity over volume — data from multiple experiments generalizes better than many images from a single session.
Transferring Data Between Machines
If you annotate on a local workstation but train on an HPC cluster, compress the Zarr before transferring:
Step 3: Apply Annotations
After downloading the JSON file exported from the GUI, apply the annotations to the Zarr to create a training-ready labeled dataset:
saber classifier labeler \
    --input training.zarr \
    --labels labels.json \
    --classes lysosome,carbon,edge \
    --output labeled.zarr
saber classifier labeler Parameters
| Parameter | Description | Default |
|---|---|---|
--input |
Zarr containing SAM2 masks | required |
--labels |
JSON file exported from the GUI | required |
--classes |
Comma-separated class names; controls index ordering | alphabetical |
--output |
Output labeled Zarr | required |
The background class is always index 0. If --classes is omitted, all annotated classes are used in alphabetical order.
Quick Assessment: Is Your Data Segmentable?
Before committing to a full annotation campaign, run a quick zero-shot preview to see what SAM2 naturally detects in your data.
SABER opens an interactive view with all SAM2 masks overlaid. If your target structures are clearly outlined, you're ready to annotate. If they're fragmented or missing, try adjusting the resolution.
Next Steps
Once your labeled Zarr is ready:
-
Split your data and train a domain expert classifier.
-
Already have a trained model? Skip straight to applying it.